Publishing a Portal
This guide publishes an internal web application on a portal of its own, step by step, and checks every step on the way. It takes about fifteen minutes, most of it waiting for DNS. Agentless Access: Portals and Applications describes every setting in detail.
The example publishes a wiki that runs at http://192.168.1.20:8080 on the
office network as wiki.example.com. Employees sign in at your identity
provider from any browser; employees with the XTNA-agent get in without
signing in again.
The detail page of every portal opens with a Setup checklist that follows the same steps: it shows which are done, which are waiting on the gateway asset, DNS or the certificate authority, and what is missing. It folds to Setup Complete once everything is in place.
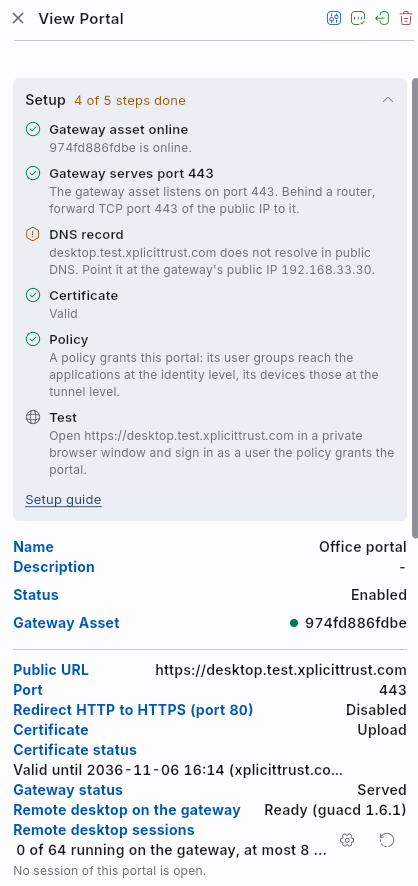
1. Choose the gateway asset
The gateway asset receives the visitors and forwards them to the application. It must be
- a Linux asset running the XTNA-agent, or the asset container image (Windows, macOS and OpenWrt assets cannot serve portals yet),
- online, with a current agent version: an agent older than a feature the portal uses refuses to serve it, and the checklist shows the gateway asset's reason, which names the feature and says to update the agent, and
- able to reach the application, here
192.168.1.20:8080. Runcurl -I http://192.168.1.20:8080on it to make sure.
The application itself needs no public address and no agent.
2. Free port 443 on the gateway asset
The agent serves the portal on port 443. Nothing else on the gateway asset may listen on it: if a web server or reverse proxy on the same host serves 443 today, for example the one the portal replaces, stop and disable it before the switch. Check with
sudo ss -tlnp 'sport = :443'
which should list nothing, or only xtna-service once the portal is saved.
3. Make port 443 reachable from the internet
Visitors and the certificate authority reach the gateway asset on its public IP address, which the Public IP column of the asset table shows.
- Behind a router, forward TCP port 443 of the public address to the gateway asset. Forward it to the gateway asset itself, not to another machine: the certificate authority checks the hostname on that port.
- A firewall in front of the asset must let TCP 443 in. The agent opens the port in the host firewall it manages.
- For the container image, publish port 443 of the container.
Port 80 is only needed if you turn on Redirect HTTP to HTTPS.
4. Create the DNS record
At your DNS provider, create an A record for the hostname pointing at the gateway asset's public IP address:
wiki.example.com. 300 IN A 203.0.113.10
Check it with dig +short wiki.example.com; it should print the gateway
asset's public address. A new record is usually visible within minutes; a
changed one can take as long as the old record's TTL.
Clients with the XTNA-agent resolve the hostname to the tunnel address by themselves. The public record is for everyone else, and for the certificate.
5. Create the portal
On the Assets page, choose Create → Portal.
General tab
| Setting | Example |
|---|---|
| Gateway Asset | The asset from step 1 |
| Name | Wiki |
| Hostname | wiki.example.com |
| Port | 443 |
| Certificate | Automatic |
Applications tab: one web application that catches every path.
| Setting | Example |
|---|---|
| Name | empty: an application at / goes by the portal's name |
| Path prefix | / |
| Upstream | http://192.168.1.20:8080 |
| Trust level | identity |
| Allowed user groups | empty |
identity asks visitors from a browser to sign in at your identity provider,
and lets employees with the agent through without signing in. Choose tunnel
instead to keep the application off the internet altogether: then only
devices with the agent reach it.
Save. The portal appears under its gateway asset, and within a few seconds the gateway asset reports that it serves it.
6. Wait for the certificate
With an Automatic certificate, the gateway asset requests one from a public certificate authority as soon as it serves the portal. This usually takes less than a minute. The Certificate step of the checklist then turns to Valid.
If it reports Issuance failed, the reason says why: almost always the DNS record does not point at the gateway asset yet, or port 443 reaches something other than the agent. Fix it; the gateway asset tries again within 15 minutes, and at once when it takes over a port that was in use.
7. Grant the portal with a policy
Nobody gets in until a policy grants the portal. On the Policies page, create a policy, or extend an existing one, with
- Source: the user group of the people who use the wiki, for example Employees, or All Users,
- Destination: the portal Wiki.
The Access tab of the portal's form does the same from the other side: it adds the portal to existing policies.
A policy with an OS, location, public IP or site condition only grants through the agent, because a browser proves no device; see Policies. A policy on the gateway asset alone opens the port but grants no portal.
8. Test
- Open
https://wiki.example.comin a private browser window on a device without the agent, or with the agent disconnected. You are sent to your identity provider; after signing in as a member of the policy's group you see the wiki. - Open the same address on a device with the agent connected and signed in as such a user. The wiki opens without a login.
- Sign in as someone outside the policy's group. The login ends with
Access denied, and the event log has a
web_app_login_deniedevent with the reasonno_policy.
All the checklist's steps are now done, and it folds to Setup Complete.
Next steps
- Give parts of the wiki a different trust level with more applications:
a public form under
/request, atunnel-only administration under/admin, or a Block application that hides it entirely. See Applications tab and the example. - Limit an application to some user groups with Allowed user groups, on top of the policy.
- Open a remote desktop, a terminal or a remote screen on a machine behind
the gateway asset from the browser with an
rdp://,ssh://orvnc://application; see Remote Desktop in the Browser, and Publishing a Remote Desktop for a guide. - Have the application read who the visitor is from the identity headers instead of asking for its own login.
- When something does not work, the troubleshooting table lists what the console and the browser show, and what to do.