Publishing a Remote Desktop
This guide opens a Windows desktop in the browser, step by step, and checks every step on the way: someone signs in at your identity provider and gets the desktop of a server on the office network, without an RDP program and without a network path to the server. A Linux terminal over SSH works the same way; see SSH instead of RDP at the end. It takes about ten minutes once a portal is running. Remote Desktop in the Browser describes every setting in detail.
The example adds the desktop of the Windows server 192.168.1.30 to the
portal portal.example.com, under https://portal.example.com/desktop/.

Before you start
You need a portal that is already served, with its hostname, DNS record and certificate in place. If you have none yet, follow Publishing a Portal up to step 6 and come back here: the desktop is one more application of that portal.
1. Prepare the gateway asset
The gateway asset of the portal opens the RDP connection with guacd,
the program that speaks RDP, SSH and VNC for the browser. You install nothing
for it: the agent downloads guacd (about 12 MB from dl.xplicittrust.com)
when the application you add in step 4 reaches it. Check two things beforehand:
- The gateway asset reaches
https://dl.xplicittrust.com. Without internet access, see the options for a Linux asset or the asset container image. -
On a Linux asset installed from the tar.gz, the
guacdaccount exists (the deb and rpm packages create it):id guacd || sudo useradd -r -U -M -d /var/empty -s /sbin/nologin guacd
The agent itself must be a current version: an older agent refuses portals with remote desktop applications, and the portal's Gateway status says why.
2. Check that the gateway asset reaches the server
The gateway asset connects to the server's RDP port, 3389. The server needs no agent and no public address, only this one connection. On the gateway asset, run
timeout 3 bash -c '</dev/tcp/192.168.1.30/3389' && echo reachable
It prints reachable. If it does not, a firewall between them, or the
Windows firewall on the server, blocks the port.
3. Prepare the Windows server
- Remote Desktop is on: Settings → System → Remote Desktop.
- Network Level Authentication is on, which is the default. The gateway asset refuses servers that offer neither NLA nor TLS, because their identity cannot be verified.
- The account may sign in remotely: an administrator, or a member of the Remote Desktop Users group.
4. Add the application
Open the portal, choose Edit and, on the Applications tab, Add application:
| Setting | Example |
|---|---|
| Name | Finance PC: what people see on the page and in the list of applications; empty shows 192.168.1.30:3389 |
| Path prefix | /desktop |
| Trust level | identity |
| Upstream | rdp://192.168.1.30 |
As soon as the upstream starts with rdp://, the application shows the
Remote desktop (RDP) settings. For this guide:
| Setting | Example |
|---|---|
| Username, Domain, Password | empty: everyone signs in with their own Windows account |
| Certificate fingerprints | empty: step 7 pins the certificate |
| Keyboard layout of the target | the layout of the Windows session, for example de-de-qwertz |
| Copy from the session, Paste into the session | on |
| File upload, File download | off |
| Idle timeout (minutes) | empty: 30 minutes |
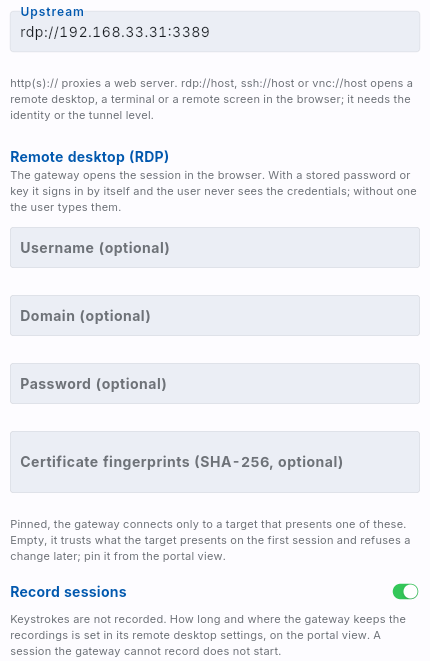
To have the gateway asset sign in by itself instead, for a shared service account for example, fill in Username, Domain and Password. People then never see the credentials, and the password never leaves the gateway asset.
Save. Within a few seconds the gateway asset picks up the new application and, for the first remote desktop application, downloads guacd, which takes a few seconds more on a usual connection. The portal's Gateway status shows Ready (guacd 1.6.1) once it is installed; until then a session shows The gateway is still installing the remote desktop service. Try again in a minute.
5. Grant the desktop with a policy
The application belongs to the portal, so the policy that grants the portal grants the desktop as well. If only some of its users may open the desktop, narrow the application with Allowed user groups, for example to IT Admins. Allowed user groups never grant on their own: the user also needs a policy that grants the portal.
6. Open the desktop
- Open
https://portal.example.com/desktop/in a browser, on a device without the agent. You are sent to your identity provider, as for anyidentityapplication. - After signing in, the page asks for the Windows username, then the password.
- The Windows desktop opens in the browser tab and follows the size of the window.
On a device with the agent connected, the identity provider login is skipped; the Windows login is still asked for.
While the desktop is open, the portal's detail page lists the session under Remote desktop sessions, with your name, the server and the Windows account. The gateway asset's session limits are set there too; see Open sessions and session limits.
7. Pin the server's certificate
At the first session the gateway asset trusted the certificate the server presented, and it refuses any other certificate from now on. Make sure it was the right one:
- Open the portal's detail page. Under Remote desktop targets the server is listed as Trusted on first use, with the SHA-256 fingerprint of its certificate.
-
On the Windows server, in PowerShell as administrator, print the fingerprint of the certificate Remote Desktop uses:
$hash = (Get-CimInstance -Namespace root/cimv2/TerminalServices ` -ClassName Win32_TSGeneralSetting -Filter "TerminalName='RDP-Tcp'").SSLCertificateSHA1Hash $cert = Get-ChildItem Cert:\LocalMachine -Recurse | Where-Object Thumbprint -eq $hash | Select-Object -First 1 ([Security.Cryptography.SHA256]::Create().ComputeHash($cert.RawData) | ForEach-Object { $_.ToString('x2') }) -join ':' -
If both fingerprints are the same, choose Pin. The fingerprint is now part of the application, and the target shows as Pinned.
If they differ, do not pin: something between the gateway asset and the server presented its own certificate. Find out what before anyone signs in again.
8. Check the audit trail
- Close the browser tab, or sign out of Windows.
- In the event log, the session shows as
web_app_desktop_session_startedandweb_app_desktop_session_ended, with the user, the Windows account they typed, the server, the duration and the end reasonclosed.
Finally, test that access really ends: open the desktop again, then choose Sign Out Everyone on the portal. Within seconds the page says Your access to this remote desktop has ended.
SSH instead of RDP
A terminal on a Linux server works the same way, with these differences:
- Step 2: the port is 22:
timeout 3 bash -c '</dev/tcp/192.168.1.31/22' && echo reachable. - Step 4: the upstream is
ssh://192.168.1.31, for example under the path prefix/terminal. The application shows the Terminal (SSH) settings. To sign in with a key, paste the private key into Private key and enter its Key passphrase; the key is checked when you save. - Step 6: the page asks for the Linux username and password, unless the application stores them or a key.
-
Step 7: the detail page shows the server's host key. Compare it on the server with the key of the same type, usually ECDSA:
ssh-keygen -lf /etc/ssh/ssh_host_ecdsa_key.pubThe
SHA256:…value must be the one the detail page shows. -
Files: with File upload and File download on, files go over SFTP into the account's home directory;
guacctl --download <file>in the terminal sends a file to the browser.
VNC instead of RDP
The screen of a VNC server, for example a machine panel, a Linux desktop or a Mac with Screen Sharing, works the same way, with these differences:
- Before you start: a VNC server cannot prove its identity, and most do not encrypt the session. Use VNC only where the gateway asset sits in the same network segment as the target; see VNC targets.
- Step 1: the gateway asset needs an agent version that supports VNC.
- Step 2: the port is 5900, or 5900 plus the display number:
timeout 3 bash -c '</dev/tcp/192.168.1.32/5900' && echo reachable. - Step 4: the upstream is
vnc://192.168.1.32, for example under the path prefix/panel. The application shows the Remote screen (VNC) settings. Store the VNC password; leave Username empty unless the server asks for one, as Apple's Screen Sharing does. - Step 6: without a stored password, the page asks for whatever the VNC server wants once the connection is up.
- Step 7: there is no key to compare. The detail page shows the security
types the server offers instead; when it shows a warning for
none, set a password on the server. - Files: VNC has no file transfer.
Next steps
-
Add more desktops as further applications of the same portal, each with its own path prefix and Name. People then find them all at
https://portal.example.com/_xt/apps; see Several applications in one portal. -
When a session does not start, the troubleshooting table lists what the page and the console show, and what to do.
- Use the
tunneltrust level instead ofidentityto keep the desktop off the internet: then only devices with the agent reach it. - Turn Paste into the session off where the browser's clipboard must not reach the server; see Clipboard and files.
- Turn Record sessions on to record every session of the application, and keep the recordings on the gateway asset or upload them to your own bucket; see Session recording.